Opening
Advertisements are annoying! Some people find them useful however the majority I believe perceive them as bothersome and irritating. In this article I will explain how you can effectively block ads in your home and office network using a mechanism of the Internet called DNS filtering. This can all be achieved with a small yet powerful Raspberry Pi!
Background
First let me begin by giving you a little backstory on why I decided to write this post and how I stumbled across a great open sourced piece of software called Pi-hole. After purchasing a new Samsung Smart TV last year I came across something infuriating after connecting it to my home internet. You can probably guess by now where I’m headed with this… it had advertisements on it!


Firstly I thought to myself surely there must be a way to turn these off. I’ve paid for this expensive piece of hardware and now its showing me ads, this is ridiculous. I couldn’t find anything in the settings of the TV besides the ability to reset your Advertising ID via the privacy settings.
A quick google search bought me to the realization that there was actually no way of turning these off. A majority of people online seemed to be unhappy requesting it be removed, complaining to Samsung to no avail. This is how I came across a method of blocking these ads by creating a DNS server of my own.
Domain Name System (DNS)
To understand how DNS filtering works you will first need to understand what DNS is and how it works. DNS stands for “Domain name system“, and it’s purpose is to translate domain names (website names) into something a web browser can understand like IP addresses. Therefore, it is a crucial part of the Internet as we know it since how many IP addresses of websites can you recall? Not many or none I’m guessing. How about how many website addresses can you remember? A few I would hope.
How it works?
This schematic I’ve created below explains how DNS works.
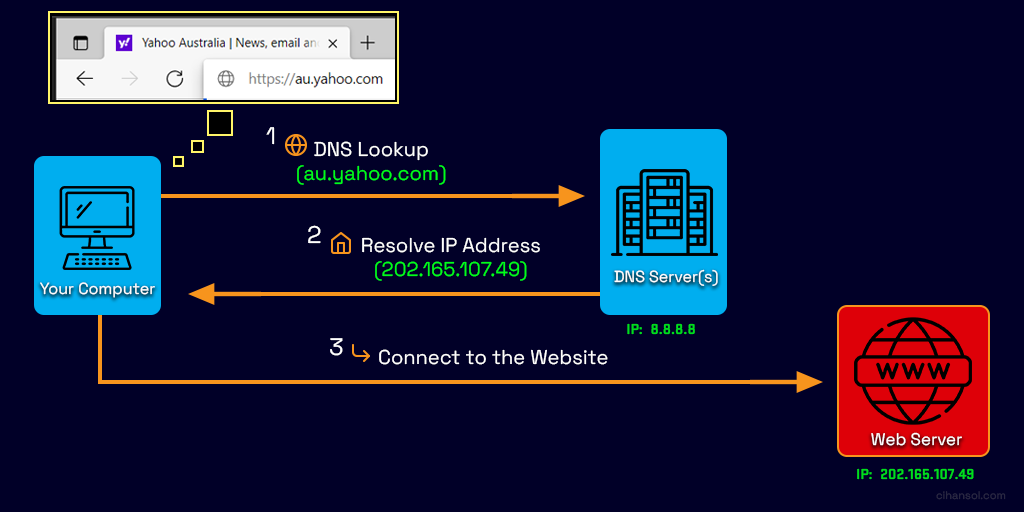
- Each time you go to a website address such as Yahoo.com your web browser fires a request off to a special server (DNS Server) with the website name (domain name).
- Without getting into more complex detail that server takes this domain name and looks the location of the server that has it’s content. It then replies with the corresponding IP Address of that server on the internet.
- The browser then can connect to the source of where the website lives and retrieve all the content to display to you.
The process I have explained is not just limited to your web browser! Any application or service that sends web requests follows this operation.
It’s worth noting that this explanation provides the basic concept of how DNS works in the context of this article which doesn’t include the finer processes involved. There is an amazing video by Computerphile which explains DNS in a more detailed manner I recommend you to check out here.
DNS Filtering
The concept I will be explaining involves DNS filtering. So what is DNS filtering? Since now we know how DNS works we can use its mechanism to our advantage in blocking ad content.
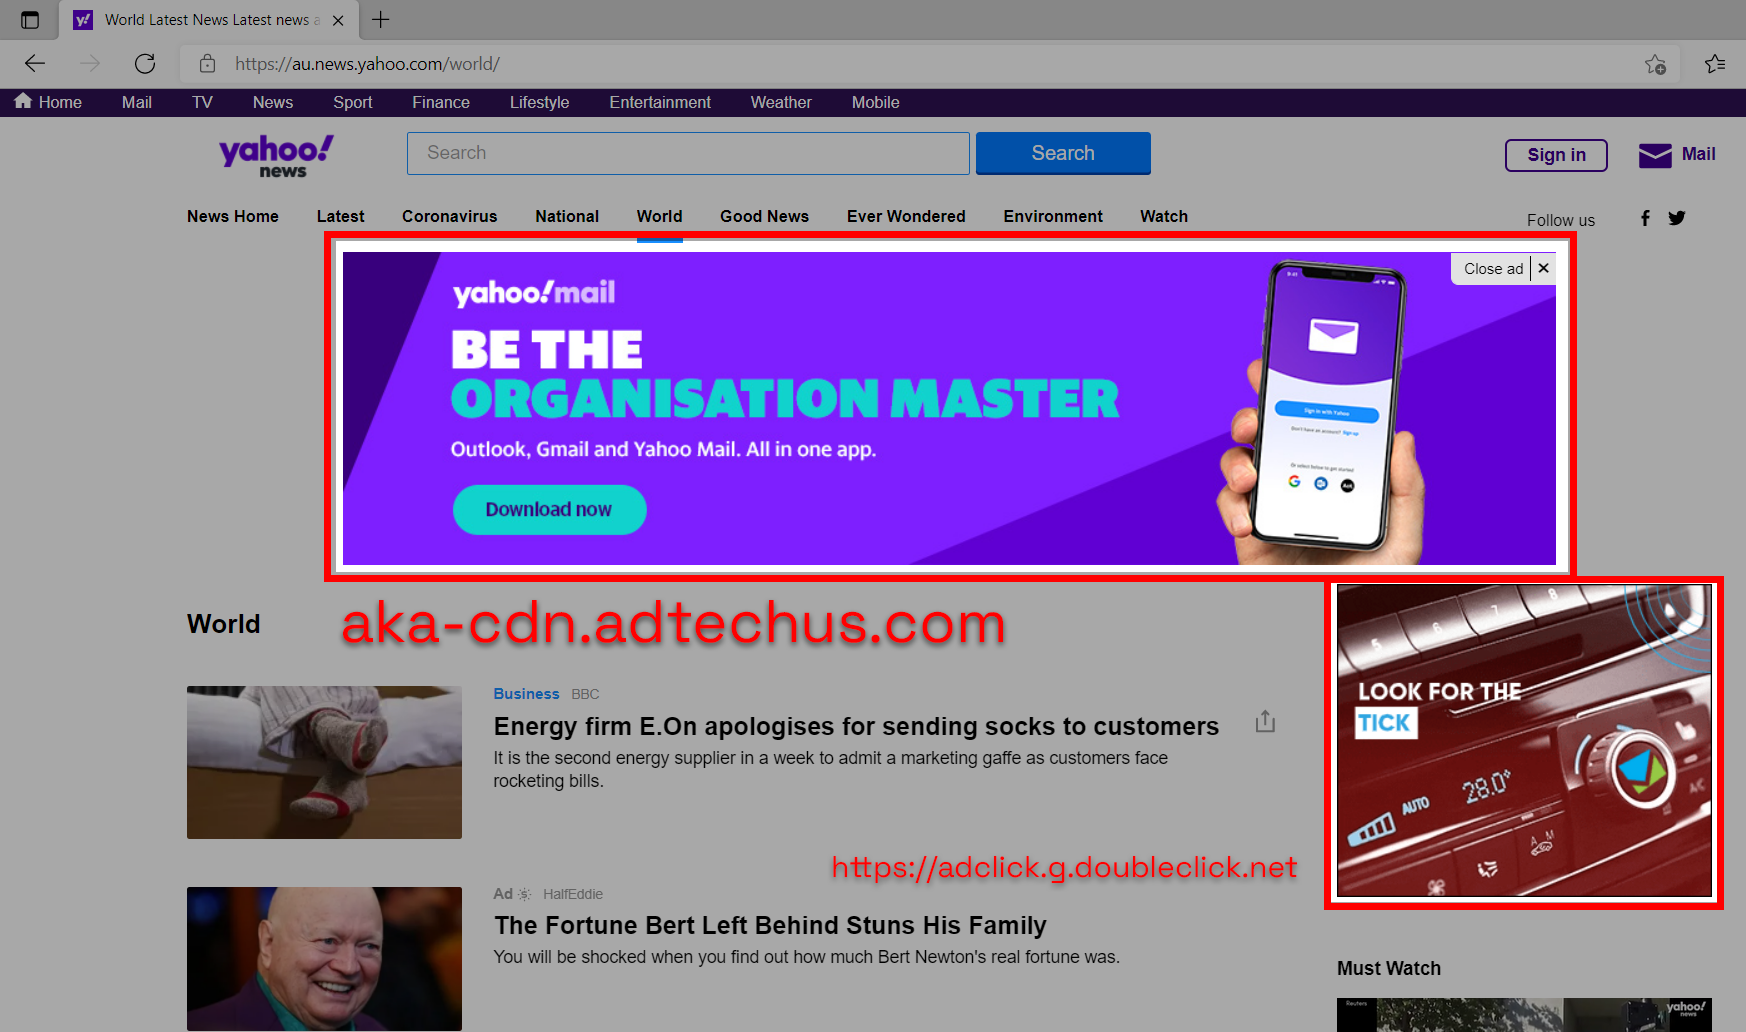
If we look at a typical website like the example picture below you can see there are multiple elements on a page. The ones highlighted in red are ads that we would rather not see. When loading this page the web browser is doing several tasks to retrieve content on the page to display which includes these ads. You can see I’ve highlighted what domain names these advertisement elements come from.
Ad blocking
To block these ads shown above from being displayed or loaded we can simply not resolve the IP addresses of the ad domains requested. It is a very cheap and effective way of blocking ads and this can be achieved in many ways.
- Firstly for this to work we will need to have some sort of blacklist of domain names that are ads or ad related. This can be done by yourself or you can use lists created by others on the Internet.
- Secondly we will need to create a DNS Server of our own to resolve domain name queries for us and block out the ones that are on the blacklist.
An easier alternative is to use another DNS Server on your device or router that does this already. There are a few public ones such as Adguard which help you block ads by using their blacklist filters. Or something a bit more customizable such as Cisco’s OpenDNS that allows you to create your own blacklists through its Web Content Filtering feature. All these options however come with their own privacy concerns and aren’t very granular in terms of control. Thus, we will create our own using a piece of software called Pi-hole.
Pi-hole
Pi-hole is an open source application that runs on the network level it creates effectively what is called a DNS sinkhole. This can be conceptualized as a blackhole for domains that are identified to be on a blacklist. Any domain passing through the Pi-hole that is identified as an ad will fail to be resolved. This will result in the Pi-hole DNS server returning nothing for the client to connect to, failing the DNS query process explained above.
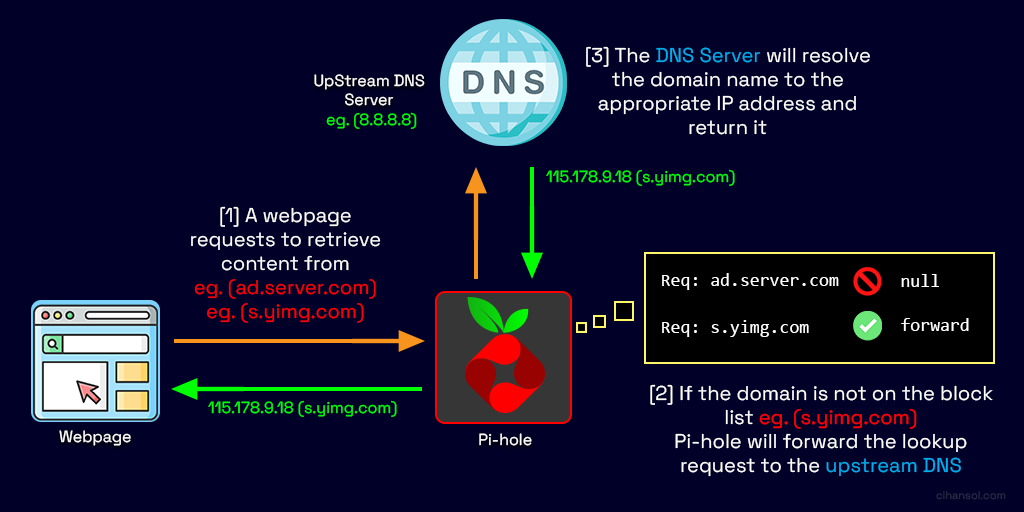 Using Pi-hole we can also effectively control domain access on our networks creating our own blacklist for websites that may be malicious or dangerous and this can also assist in filtering out adult content for the young ones or employees in your home or office network.
Raspberry Pi Zero W
For this guide we will be using a Raspberry Pi Zero W however any Raspberry Pi can work. The benefits using the Pi Zero W is it’s form factor being smaller than its predecessor device yet more powerful and the W variant means it comes with built in Wi-Fi and Bluetooth (4.1 + BLE).
You can source yourself one or find out more information about it via
I picked one up for around $18 AUD from an online local reseller. We will also require a few additional items for this project. These include a MicroSD card to store the Operating System (OS) and data along with a power adapter to power the device.
- https://www.tomshardware.com/best-picks/raspberry-pi-microsd-cards
- https://www.raspberrypi.com/products/micro-usb-power-supply
Setup
Once we have all our hardware we will need to prepare the SD card to install the OS. Here is a quick setup guide providing links to adafruit.com a great place to learn and create projects with electronic hardware. I will be using Windows for this guide but the concepts apply similarly on Mac and Linux.
- Download the latest ‘Lite’ Raspbian to your computer
- Burn the Lite Raspbian to your micro SD card using your computer
- Re-plug the SD card into your computer and set up your wifi connection by editing supplicant.conf. (Note you will need to use a 2.4Ghz SSID)
- Activate SSH support
- Plug the SD card into the Pi Zero W
- If you have an HDMI monitor you can connect it via a mini HDMI adapter to the Pi Zero. This helps seeing the bootup process so you know everything is functioning correctly but is not a requirement.
- Plug in power to the Pi Zero W – you will see the green LED flicker a little. The Pi Zero will reboot while it sets up so wait a good 10 minutes
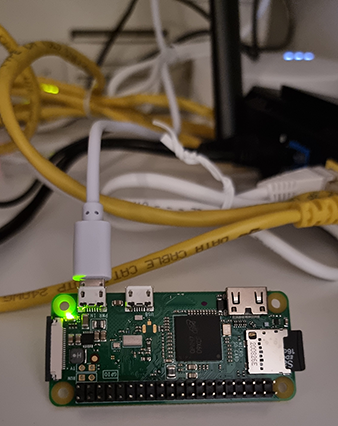
Pi-hole on Raspberry Pi Zero W
 SSH
SSH
Before we can proceed to install Pi-hole we will need a way to interface with the device, this can be achieved by opening a Secure Shell (SSH) connection. For that we will need a SSH client. In this guide we will use one called Putty which you can download from here.
After running the SSH client Putty we need to acquire the IP address of the device to connect to it on your local network. You can optionally connect to it via the raspberrypi.local name however, I personally found it was easier to find the IP address of the device through my router’s admin configuration panel. You can do this by looking for a device with the vendor name “Raspberry Pi Foundation” or MAC address starting with “B8:27:EB“.
We can then configure and connect to it by typing in the address and selecting the SSH option. Additionally you can also set the username by going to Connection->Data in the Category List and setting the “Auto-login username” to pi, followed by saving the session settings. This helps speed up the connection time so you only really need to type in the password next time you connect.
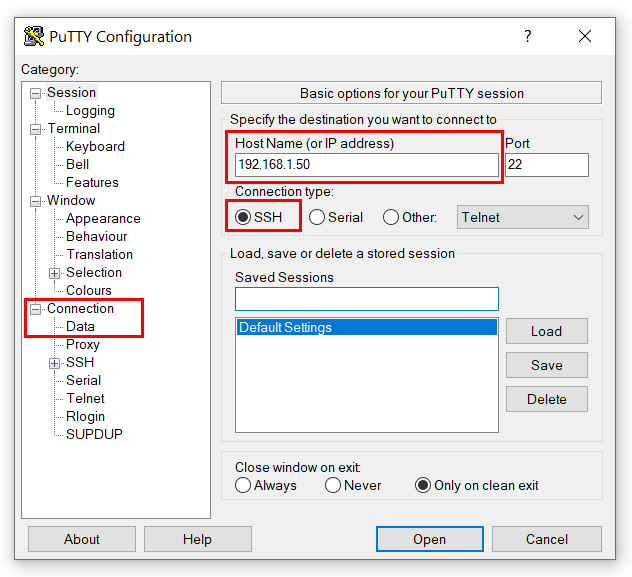
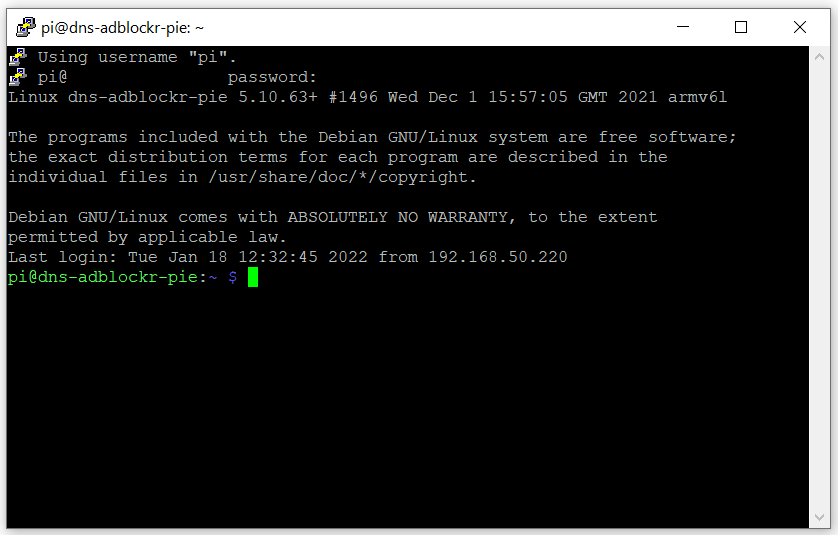
Clicking on the Open button will display the terminal window which may prompt you to enter the password for the user pi. Typically the default password is “raspberry” however this may change depending on the OS installed.
Once logged in you should see the terminal window similar to the image below:
Configuration
Once we have connected successfully to the Raspberry Pi Zero W there are some configurations we can make to better identify the device. One of these is setting the hostname. We can go ahead and change this via the command:
sudo nano /etc/hostname
This will bring up the nano text editor where you can configure the name to what best represents this Pi. In my case I have it as “dns-adblockr-pie“.
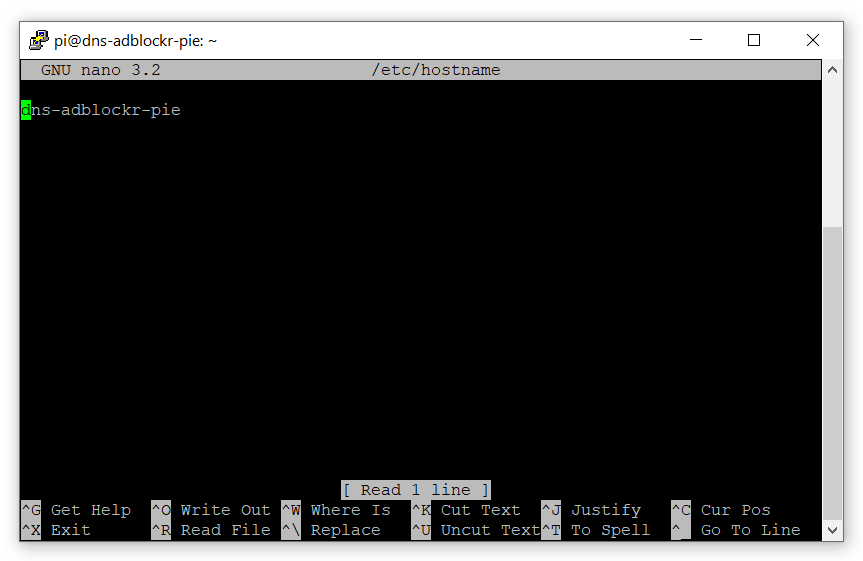
Control + O, Control + X to save and exit confirming the output when asked. To learn more on how to use the nano text editor check out this article.
We will then need to also change the hosts file to also mirror this via the following command.
sudo nano /etc/hosts
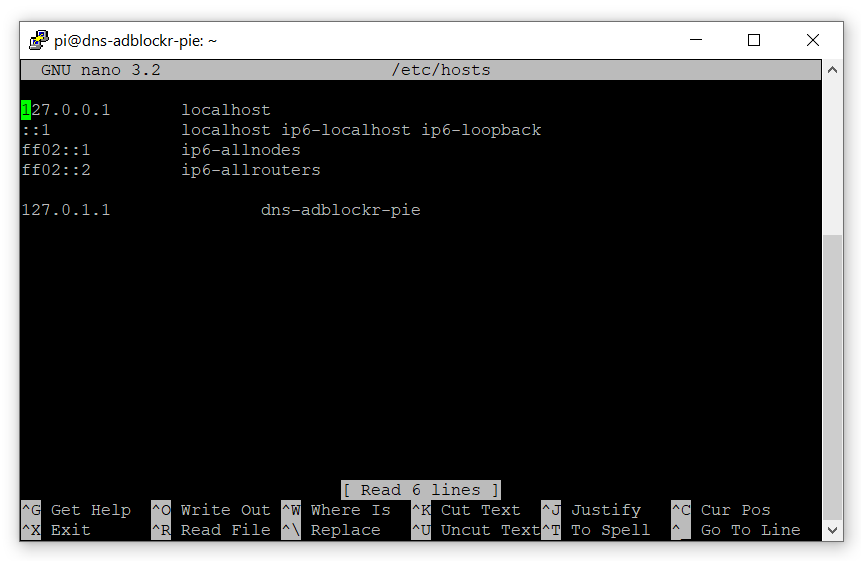
Change the last line with the same name you set in the previous file then save and exit.
Pi-Hole Installation
The easiest method by far to install Pi hole would have to be this one:
curl -sSL https://install.pi-hole.net | bash
It will guide you through a command line installation wizard which may prompt you at stages to pick certain configuration options. If you would like more information or alternative means of installation you can check out the Pi-hole website.
Here are the options presented and what you should pick:
- 1. Upstream DNS Provider [Google or CloudFlare]
- This is what we talked about in an earlier diagram, it will receive the traffic that isn’t blocked by Pi-hole to resolve IP addresses.
- 2. Third Party Block List [Stevenblack’s Unified Hosts List]
- Select the default list that appears you can modify this later if you wish to change to another list.
- 3. Protocol (IPv4)
- Lets stick to ipv4 unless you require otherwise.
- 4. Current Network Settings as static
- This option if presented will attempt to set the current IP address assigned to your Pi as the permanent address that will be used; Effectively your DNS server IP.
- 5. Do you wish to install the web admin interface? [On]
- You want to definitely enable this option. It will allow you to view the queries coming into your DNS server along with useful statistics and the ability to setup your own blacklist entries easily.
- 6. Install the lightppd web server [On]
- Leave this setting as recommended
- 7. Do you want to log queries [On]
- 8. Privacy Mode [Log Everything]
- This option is really up to you, if you decide to not log domain entries it may be difficult to block future ads that are not in the blacklist.
Once the installation completes it will present you with a final screen showing you the default admin webpage password that was generated. Write this down as you will need it to access the web interface, you may change this password at a later point in time.
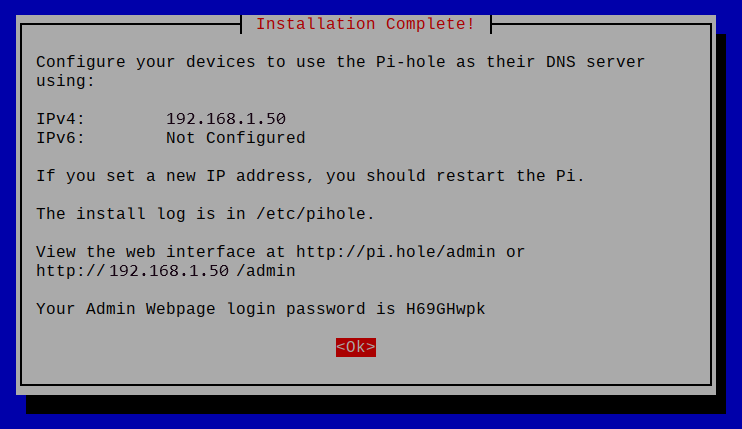
Congratulations you have successfully setup Pi-hole! You may now proceed to set the DNS server on your router or devices connected to your network.
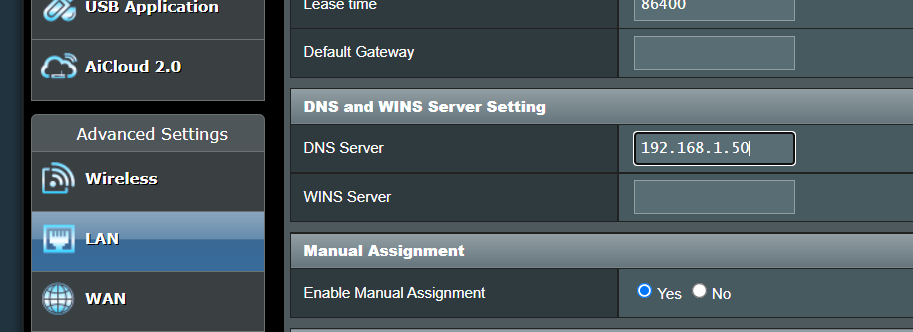
You should also make sure to reserve the IP address assigned to the Raspberry Pi. If in the case the IP address changes it will break all clients connected as the once known IP address of the DNS server (Pi) will no longer be valid.

Admin Interface
The admin interface can now be accessed by your web browser using the Pi-hole’s IP address.
http://192.168.1.50/admin
You may change the default password presented to you in the final screen of the installation wizard with this command:
pihole -a -p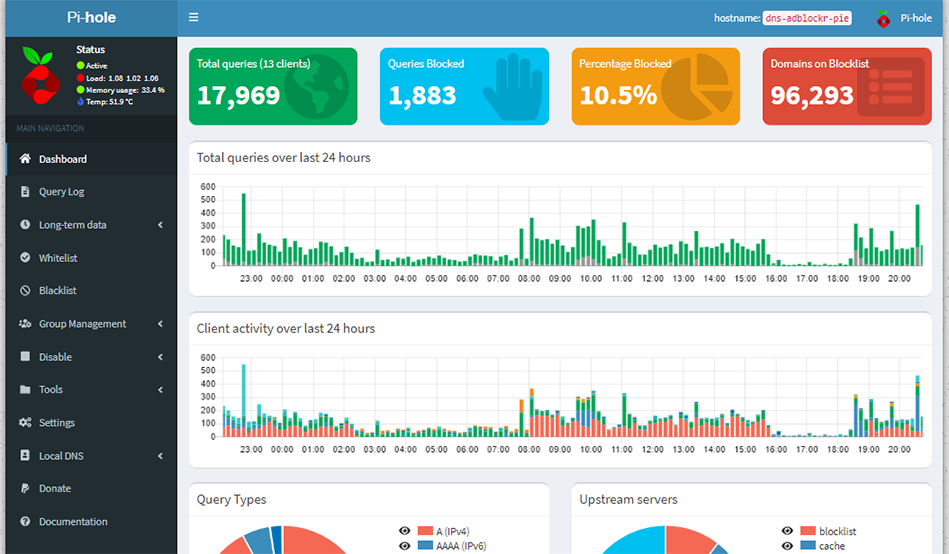
Effectiveness & Tweaks
You may now load a website that contains advertisements to see if the ad filtering is functioning correctly.

In the above screenshot you can see on the right side snapshot there are ads that appear at the top and on the left sidebar. The left side however has empty space where these ads would normally load.
You can also add in your own entries to the blacklist if you find any that doesn’t get blocked.

The effectiveness of this method does have issues. DNS filtering offers a very ‘crude’ method of filtering. It will not remove white spaces left behind or in some cases the frame where ads would normally be placed may appear broken like in the following screenshot:

Regardless it is still an effective method of filtering ads and in my situation it did in fact get rid of the banner ads that appeared on my Smart TV along with various apps on my phone. It also unlocked a lot more control over traffic on my network.
Conclusion
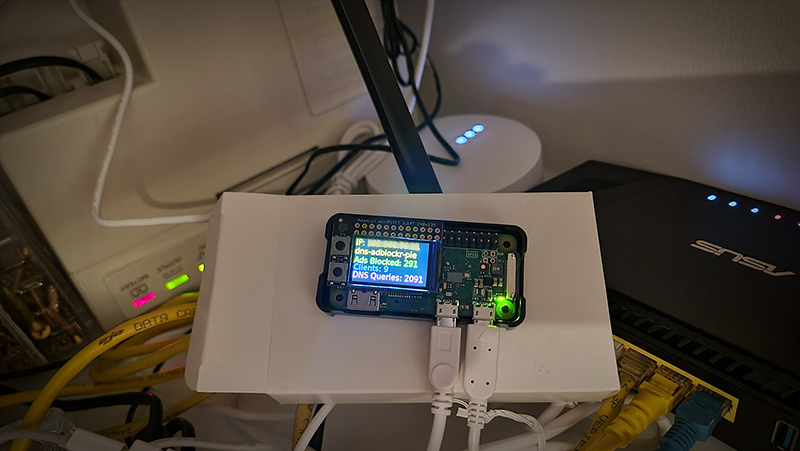
Pi-hole providers a great way to filter advertisements on your local network and opens up a lot more opportunities for finer network traffic control. In a future post I may cover how to connect a small OLED screen to your PI to display statistics and device information. Until then happy ad blocking!
Links & Resources
- https://projects.raspberrypi.org/en
- https://pi-hole.net
- https://github.com/pi-hole/pi-hole
- https://www.cloudflare.com/en-au/learning/dns/what-is-dns/

